Mistral is a sophisticated AI model created especially for seamless AWS compatibility, combining power and simplicity in one convenient package. It accommodates both beginners and specialists, providing simple access to strong AI capabilities without the usual complications.
Video Guide
Prerequisites
Before you get started with the Mistral AMI, ensure you have the following prerequisites:
- Basic knowledge of AWS services, including EC2 instances and CloudFormation.
- An active AWS account with appropriate permissions.
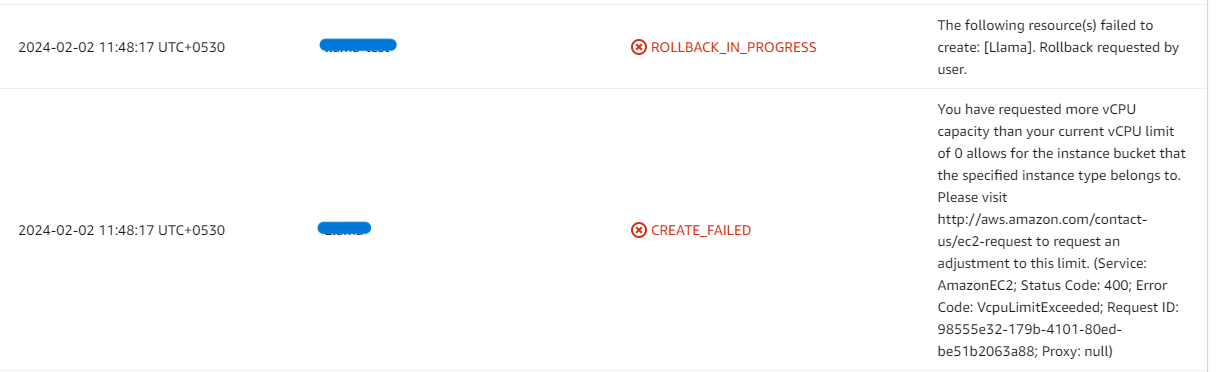
- Enough vCPU limit to create g5g type instances. If you encounter a vCPU quota error when launching the stack, follow https://meetrix.io/blogs/increase-aws-vcpu-quota/ to increase your vCPU limit.
Launching the AMI
Step 1: Find and Select "Mistral" AMI
- Log in to your AWS Management Console.
- Follow the provided links to access the "Mistral" product you wish to set up:
Step 2: Initial Setup & Configuration
- Click the "Continue to Subscribe" button.
- After subscribing, you will need to accept the terms and conditions. Click on "Accept Terms" to proceed.
- Please wait for a few minutes while the processing takes place. Once it's completed, click on "Continue to Configuration".
- Select the "CloudFormation Template for Mistral deployment" as the fulfilment option and choose your preferred region on the "Configure this software" page. Afterward, click the "Continue to Launch" button.
- From the "Choose Action" dropdown menu in "Launch this software" page, select "Launch CloudFormation" and click "Launch" button.
Create CloudFormation Stack
Step 1: Create stack
- Ensure the "Template is ready" radio button is selected under "Prepare template".
- Click "Next".
Step 2: Specify stack options
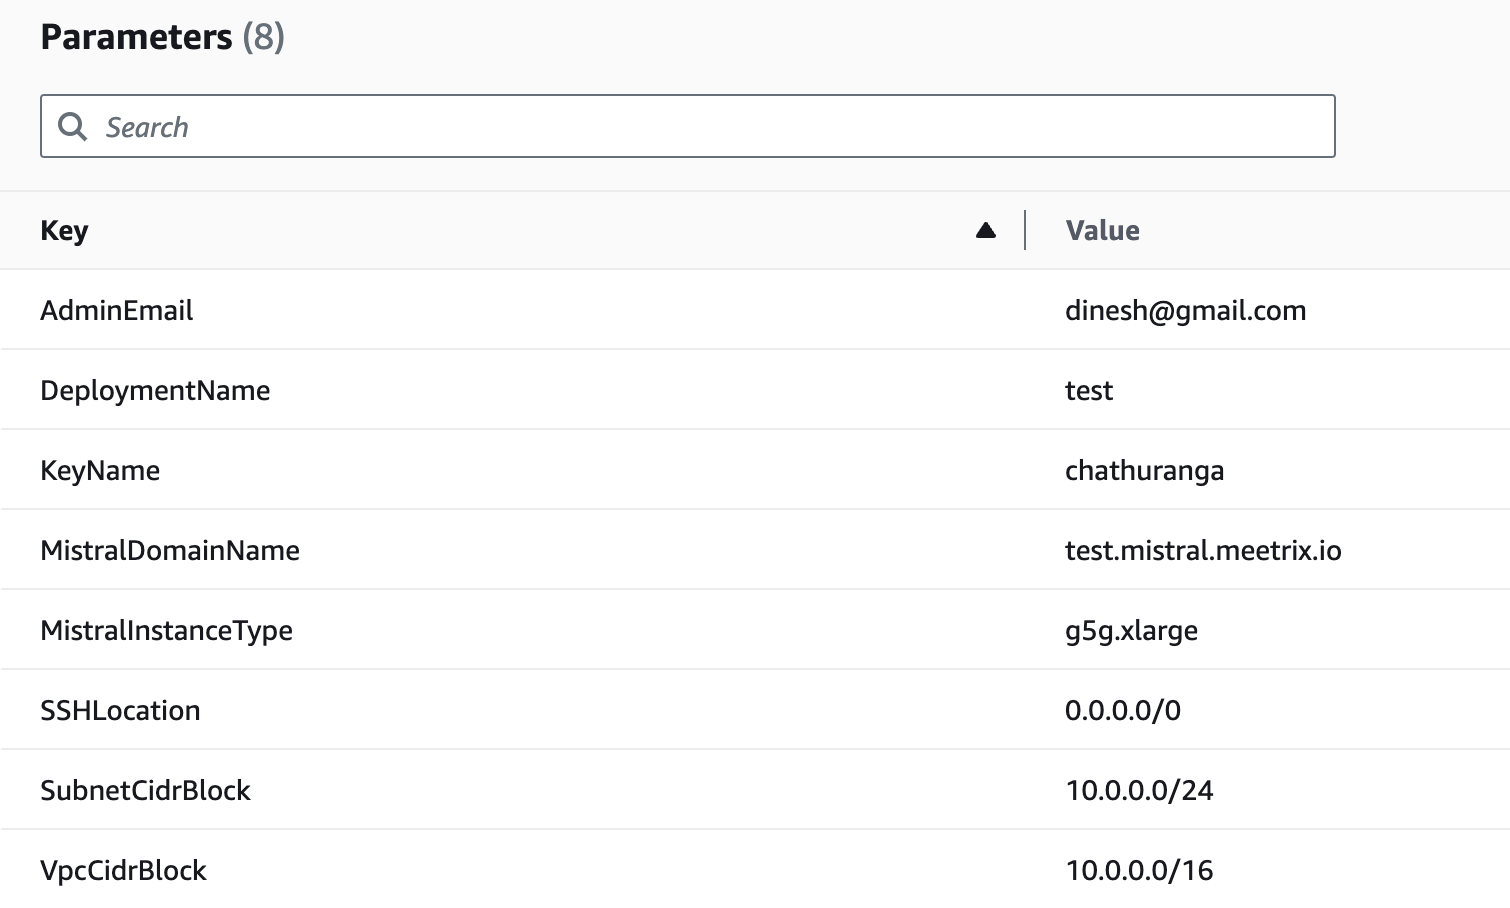
Provide the necessary parameters for your Mistral deployment. These settings define how your instance will be configured.
| Parameter | Description |
|---|---|
| Stack name | A unique name for your CloudFormation stack. |
| Admin Email | The email address used for SSL generation. |
| DeploymentName | A name for your deployment, of your choice. |
| keyName | The name of your preferred EC2 key pair for SSH access. |
| MistralDomainName | Your public domain name. Mistral will automatically try to set up SSL if this domain is hosted on Route 53. If unsuccessful, you will need to set up SSL manually. |
| MistralInstanceType | The EC2 instance type. Recommended: g5g.xlarge. |
| SSHLocation | The IP address range for SSH access. Defaults to 0.0.0.0/0 (open to all). For better security, restrict this to your IP. |
| SubnetCidrBlock | The CIDR block for the subnet. Defaults to 10.0.0.0/24. |
| VpcCidrBlock | The CIDR block for the VPC. Defaults to 10.0.0.0/16. |
Click "Next".
Step 3: Configure stack options
- Under "Stack failure options", select "Roll back all stack resources".
- Click "Next".
Step 4: Review
- Review and verify the details you've entered.
- Tick the box that says, "I acknowledge that AWS CloudFormation might create IAM resources with custom names".
- Click "Submit".

Afterward, you'll be directed to the CloudFormation stacks page.
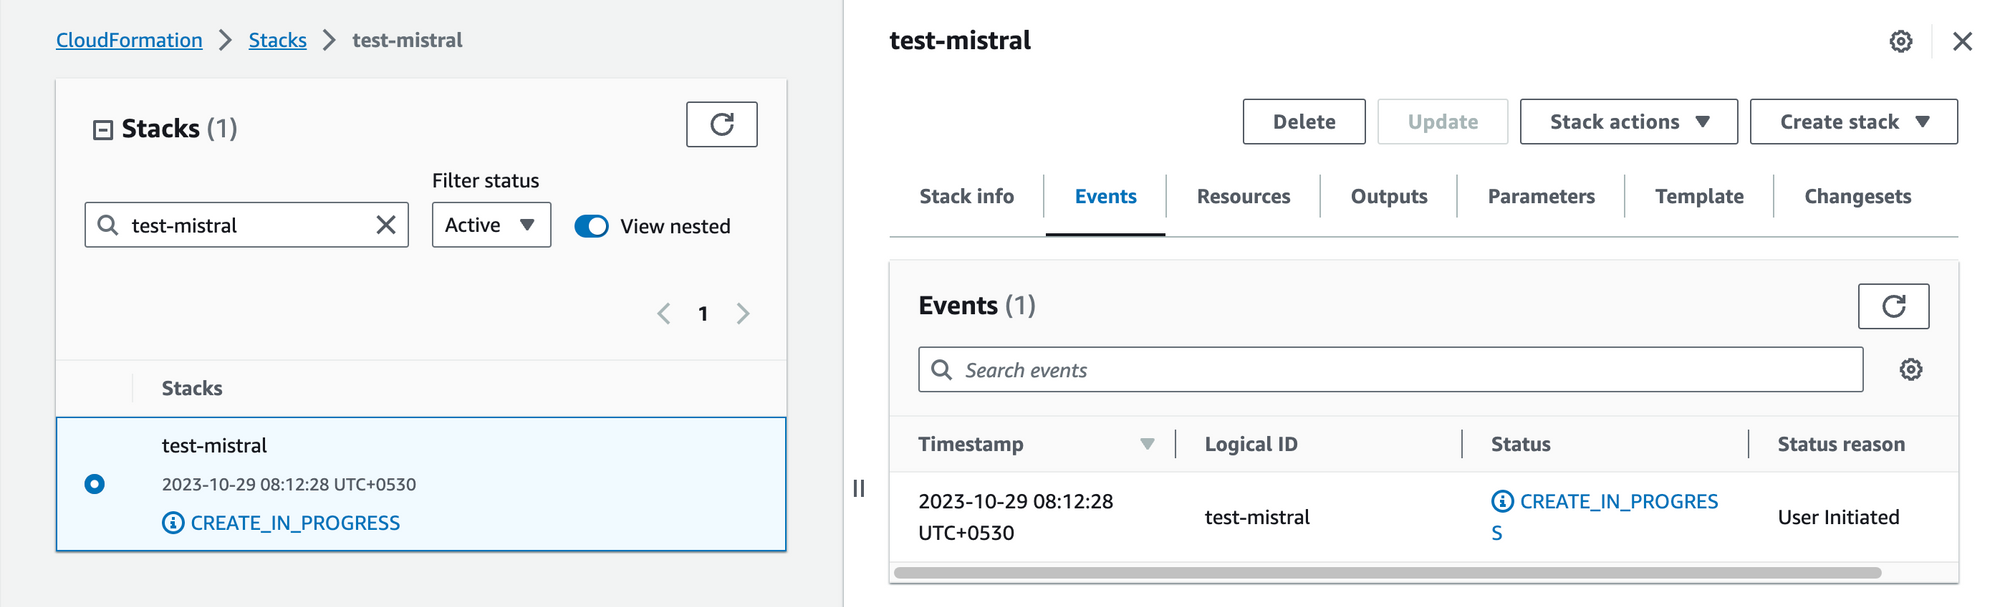
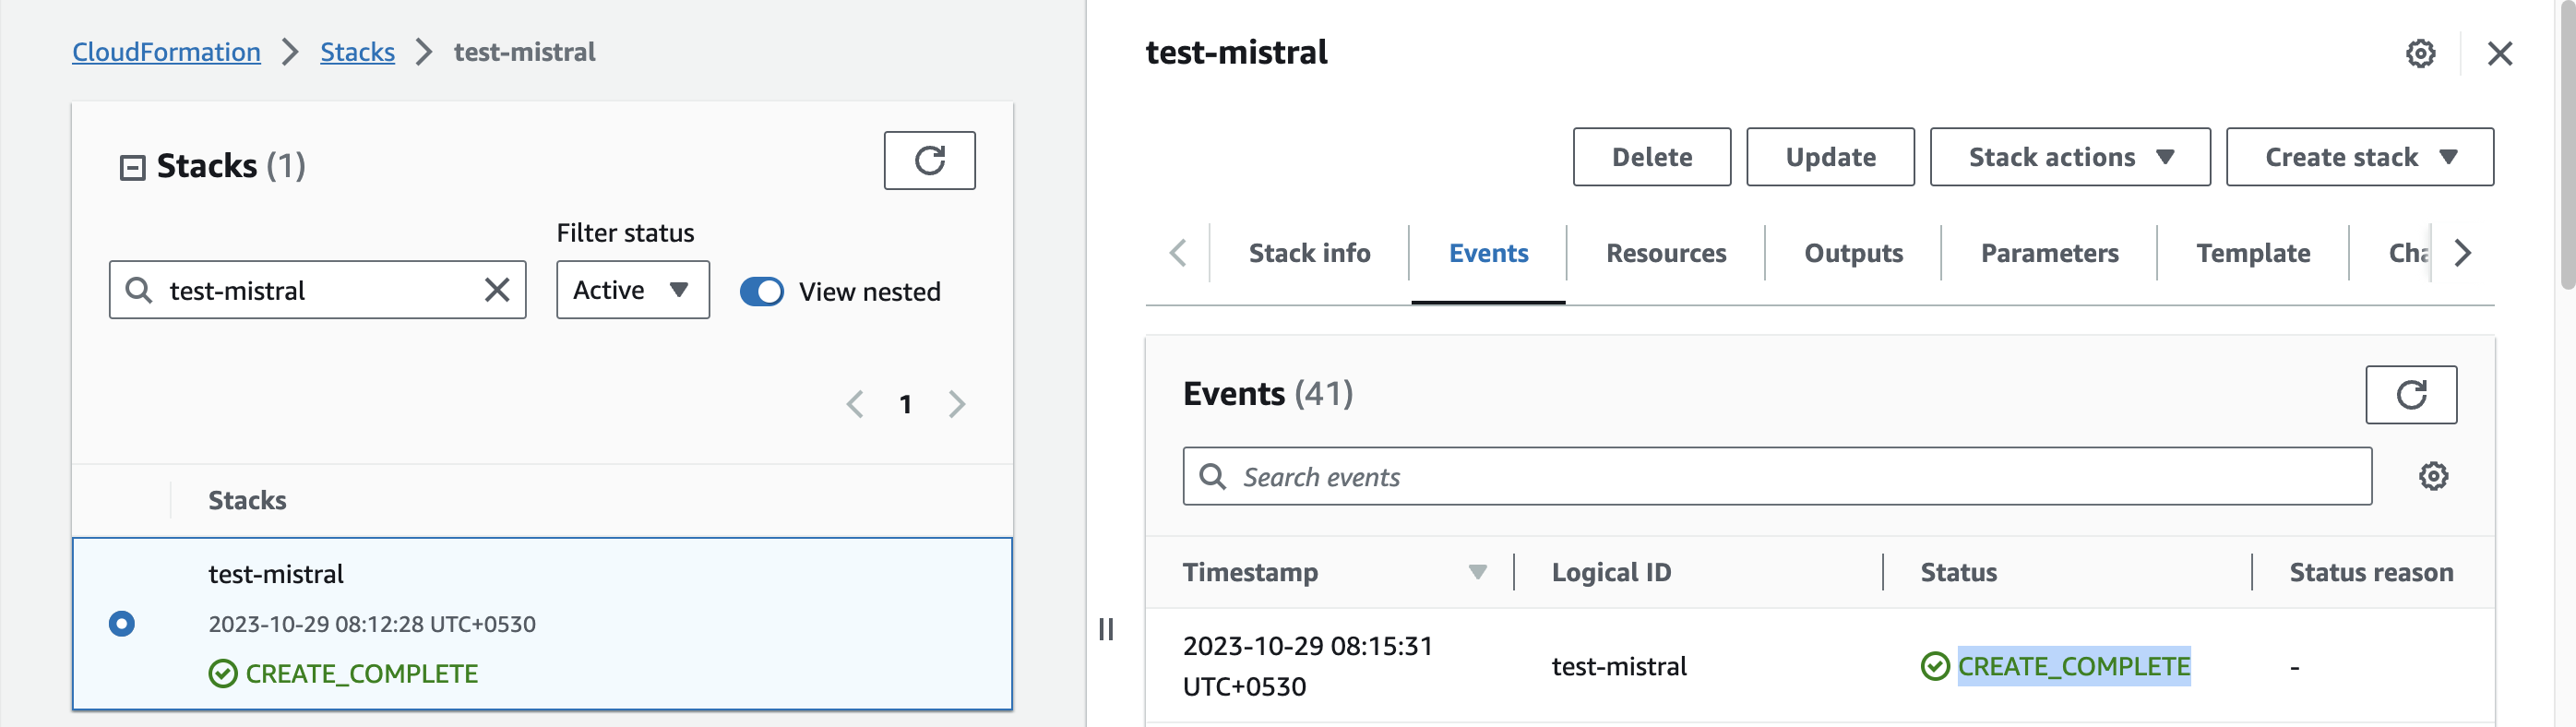
Please wait for 5-10 minutes until the stack has been successfully created.
Update DNS
Step 1: Copy IP Address
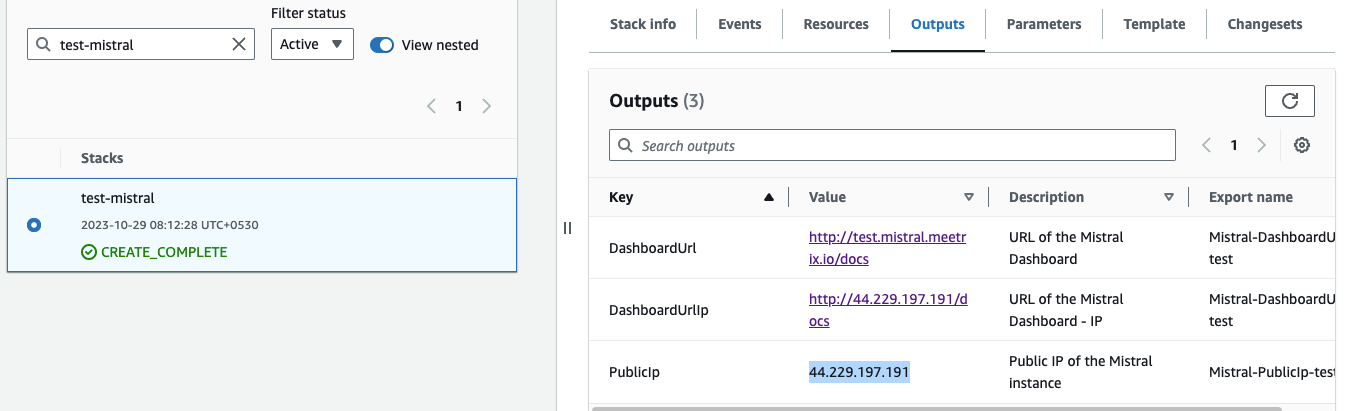
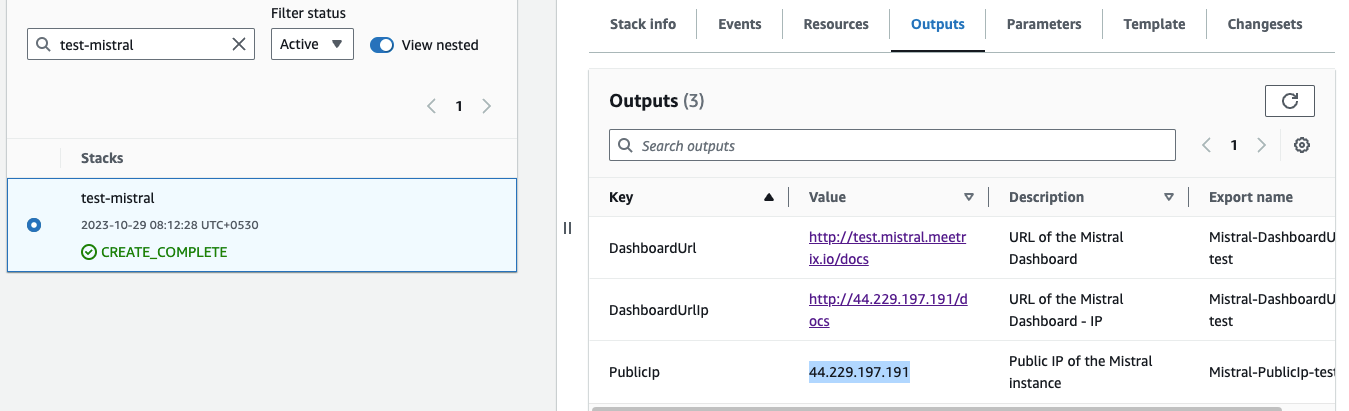
Copy the public IP labeled "PublicIp" in the "Outputs" tab.
Step 2: Update DNS
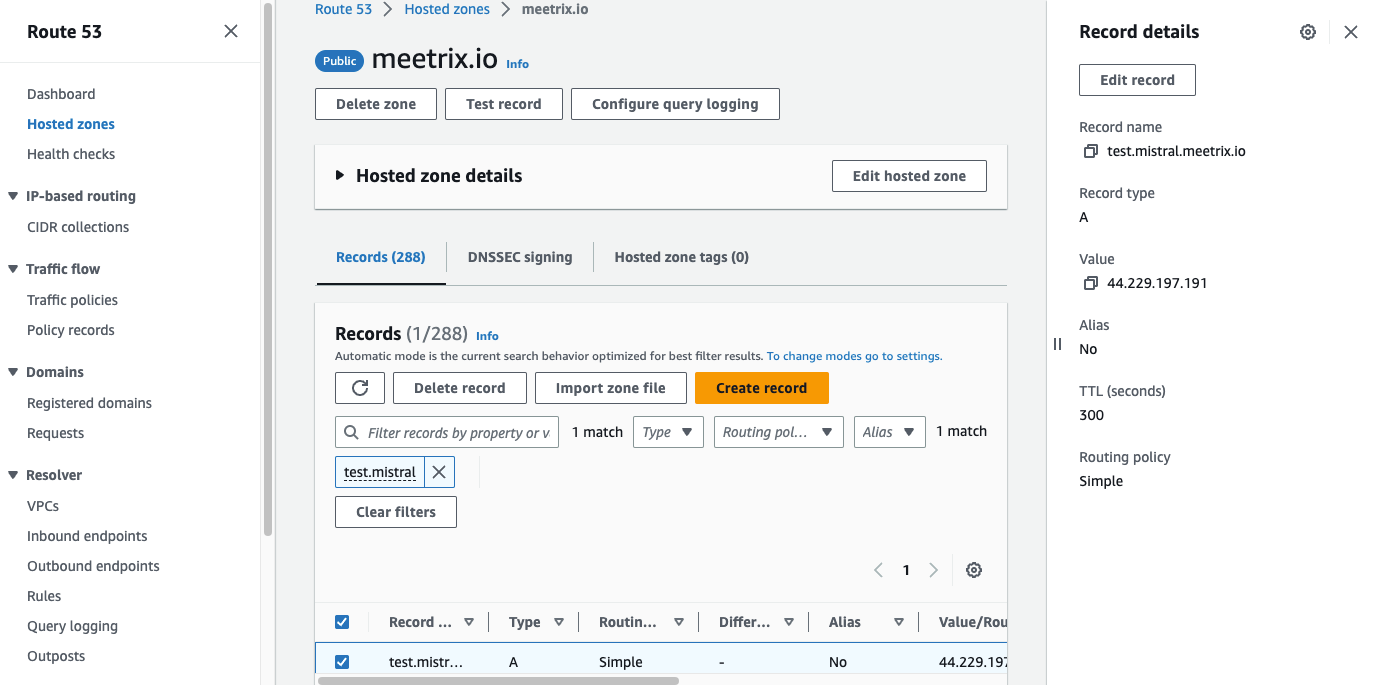
- Go to AWS Route 53 and navigate to "Hosted Zones".
- From there, select the domain you provided to "MistralDomainName".
- Click "Edit record" in the "Record details" and then paste the copied "PublicIp" into the "value" textbox.
- Click "Save".
Access Mistral
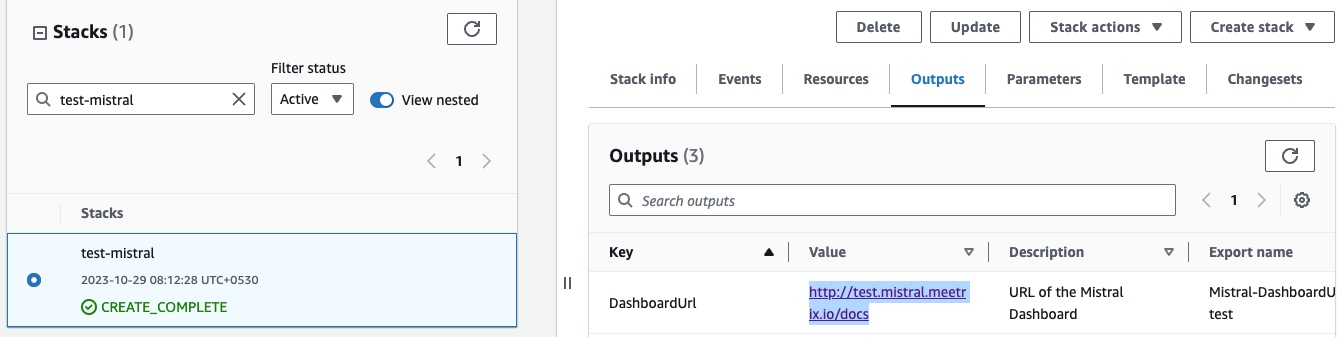
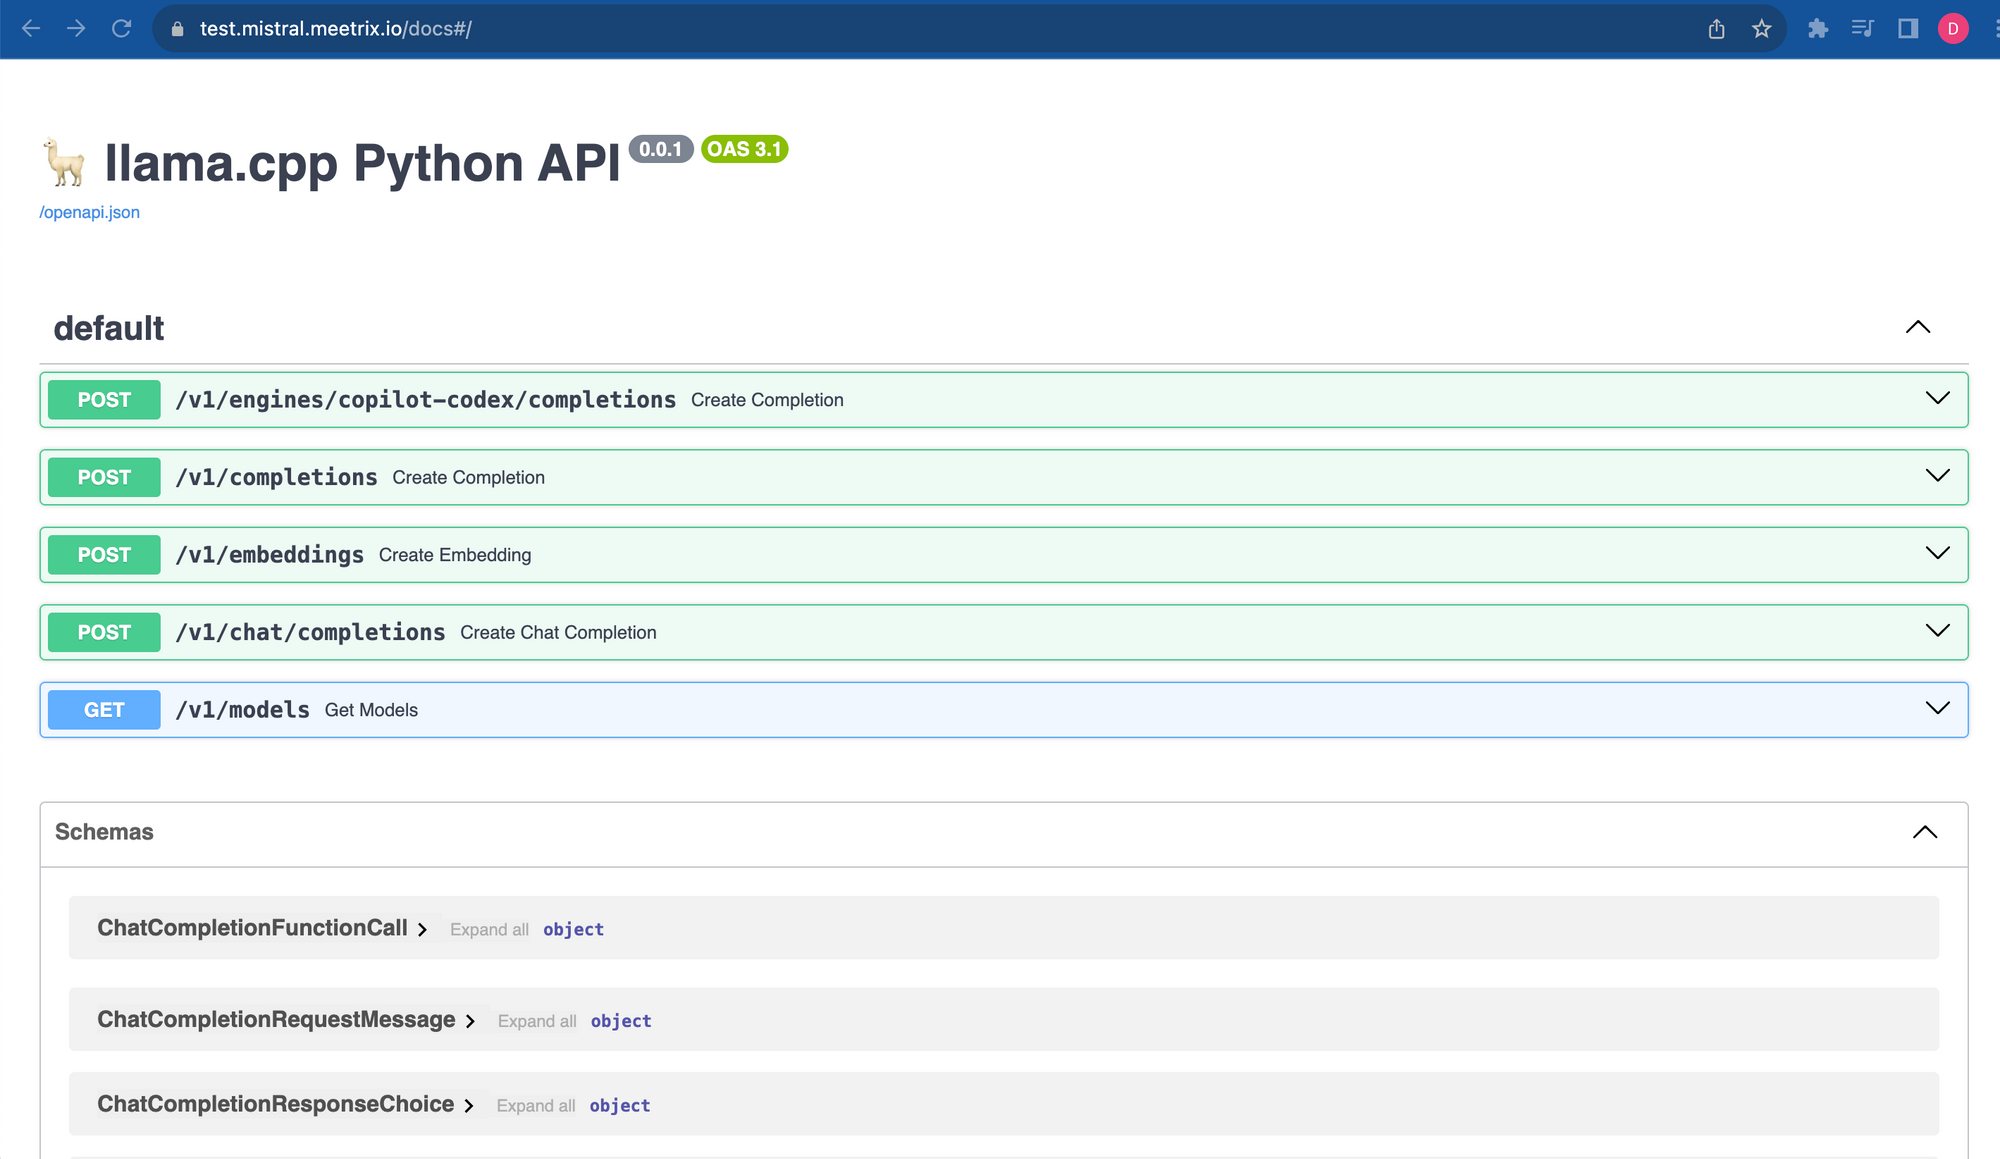
You can access the Mistral application through the "DashboardUrl" provided in the "Outputs" tab.
Note
Generate SSL Manually
Mistral will automatically try to setup SSL based on provided domain name, if that domain is hosted on Route53. If it's unsuccessful then you have to setup SSL manually.
Step 1: Copy IP Address
- Proceed with the instructions outlined in the above "Update DNS" section, if you have not already done so.
- Copy the Public IP address indicated as "PublicIp" in the "Outputs" tab.
Step 2: Log in to the server
- Open the terminal and go to the directory where your private key is located.
- Paste the following command into your terminal and press Enter:
ssh -i <your key name> ubuntu@<Public IP address>- Type "yes" and press Enter. This will log you into the server.

Step 3: Generate SSL
Paste the following command into your terminal and press Enter and follow the instructions:
sudo /root/certificate_generate_standalone.shAdmin Email is required to generate SSL certificates.
Shutting Down Mistral
- Click the link labeled "Mistral" in the "Resources" tab to access the EC2 instance, you will be directed to the Mistral instance in EC2.
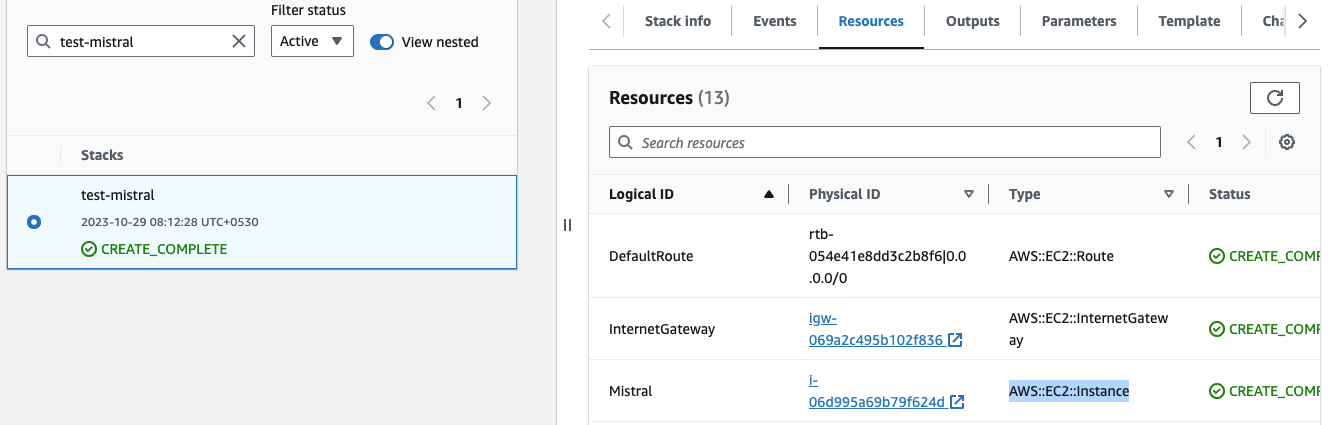
- Select the Mistral instance by marking the checkbox and click "Stop instance" from the "Instance state" dropdown. You can restart the instance at your convenience by selecting "Start instance".

Remove Mistral
Delete the stack that has been created in the AWS Management Console under "CloudFormation Stacks" by clicking the "Delete" button.
API Documentation
1. Retrieve Completions from CoPilot Codex Engine
Retrieves completions from the CoPilot Codex Engine based on the provided prompt.
- Endpoint: /v1/engines/copilot-codex/completions
- Method: POST
- Request Body:
{
  "prompt": "\n\n### Instructions:\nWhat is the capital of France?\n\n### Response:\n",
  "stop": [
    "\n",
    "###"
  ]
}
Response Body:
{
  "id": "cmpl-d2dcaf7a-bf25-4a10-b0f0-84e8ad29f17c",
  "object": "text_completion",
  "created": 1698551108,
  "model": "/root/models/mistral-7b-instruct-v0.1.Q5_K_M.gguf",
  "choices": [
    {
      "text": "The capital of France is Paris.",
      "index": 0,
      "logprobs": null,
      "finish_reason": "stop"
    }
  ],
  "usage": {
    "prompt_tokens": 22,
    "completion_tokens": 7,
    "total_tokens": 29
  }
}
2. Retrieve Completions
Retrieves completions based on the provided prompt.
- Endpoint: /v1/completions
- Method: POST
- Request Body:
{
  "prompt": "\n\n### Instructions:\nWhat is the capital of France?\n\n### Response:\n",
  "stop": [
    "\n",
    "###"
  ]
}
Response Body:
{
  "id": "cmpl-06b1aaed-c1b4-4048-a408-24b44989d004",
  "object": "text_completion",
  "created": 1698551302,
  "model": "/root/models/mistral-7b-instruct-v0.1.Q5_K_M.gguf",
  "choices": [
    {
      "text": "The capital of France is Paris.",
      "index": 0,
      "logprobs": null,
      "finish_reason": "stop"
    }
  ],
  "usage": {
    "prompt_tokens": 22,
    "completion_tokens": 7,
    "total_tokens": 29
  }
}
3. Retrieve Embeddings
Retrieves embeddings based on the provided input text.
- Endpoint: /v1/embeddings
- Method: POST
- Request Body:
{
  "input": "The food was delicious and the waiter..."
}
Response Body:
{
    "object": "list",
    "data": [
        {
            "object": "embedding",
            "embedding": [
                -0.07521496713161469,
                0.44098934531211853,
                0.6786724328994751
            ],
            "index": 0
        }
    ],
    "model": "/root/models/mistral-7b-instruct-v0.1.Q5_K_M.gguf",
    "usage": {
        "prompt_tokens": 10,
        "total_tokens": 10
    }
}
4. Retrieve Chat Completions
Retrieves chat completions based on the provided chat messages.
- Endpoint: /v1/chat/completions
- Method: POST
- Request Body:
{
  "messages": [
    {
      "content": "You are a helpful assistant.",
      "role": "system"
    },
    {
      "content": "What is the capital of France?",
      "role": "user"
    }
  ]
}
Response Body:
{
  "id": "chatcmpl-b1d7dcbb-9d44-47cc-a3b4-d199371a87aa",
  "object": "chat.completion",
  "created": 1698551651,
  "model": "/root/models/mistral-7b-instruct-v0.1.Q5_K_M.gguf",
  "choices": [
    {
      "index": 0,
      "message": {
        "role": "assistant",
        "content": "\nThe capital city of France is Paris."
      },
      "finish_reason": "stop"
    }
  ],
  "usage": {
    "prompt_tokens": 35,
    "completion_tokens": 9,
    "total_tokens": 44
  }
}
5. List Models
Retrieves a list of available models.
- Endpoint: /v1/models
- Method: GET
- Response Body:
{
  "object": "list",
  "data": [
    {
      "id": "/root/models/mistral-7b-instruct-v0.1.Q5_K_M.gguf",
      "object": "model",
      "owned_by": "me",
      "permissions": []
    }
  ]
}
Testing the API
- Create a directory.
- Create 3 files (full code is given below): app.js, package.json, .env
- Run the following command:
npm install- Edit the variable file (.env).
- Run the following command:
npm start- You will get the responses.
app.js
const axios = require('axios');
require('dotenv').config();

const makePostRequest = async (url, data, timeout) => {
  try {
    const response = await axios.post(url, data, { timeout });
    return { success: response.status === 200, data: response.data };
  } catch (error) {
    return { success: false, error: error.message };
  }
};

const makeGetRequest = async (url, timeout) => {
  try {
    const response = await axios.get(url, { timeout });
    return { success: response.status === 200, data: response.data };
  } catch (error) {
    return { success: false, error: error.message };
  }
};

const printResponseData = (endpoint, data) => {
  console.log(`Response for ${endpoint}:`);
  console.log(JSON.stringify(data, null, 2));
  console.log('');
};

const checkEndpoints = async () => {
  const baseUrl = process.env.BASE_URL;
  const model = process.env.MODEL;

  const endpoints = [
    { path: '/completions', method: makePostRequest, data: { "model": model, "prompt": process.env.PROMPT1 }, printEnv: 'PRINT_COMPLETIONS_RESPONSE' },
    { path: '/embeddings', method: makePostRequest, data: { "input": process.env.PROMPT2, "model": model }, printEnv: 'PRINT_EMBEDDINGS_RESPONSE' },
    { path: '/chat/completions', method: makePostRequest, data: { "messages": [{ "content": "You are a helpful assistant.", "role": "system" }, { "content": process.env.PROMPT1, "role": "user" }], "model": model }, printEnv: 'PRINT_CHAT_COMPLETIONS_RESPONSE' },
    { path: '/models', method: makeGetRequest, printEnv: 'PRINT_MODELS_RESPONSE' }
  ];

  for (const endpoint of endpoints) {
    const url = `${baseUrl}${endpoint.path}`;
    const { success, data, error } = await endpoint.method(url, endpoint.method === makePostRequest ? endpoint.data : null, process.env.REQUEST_TIMEOUT || 50000);
    const printResponse = process.env[endpoint.printEnv] === 'true';

    if (success) {
      console.log(`*** Endpoint ${endpoint.path} is reachable.`);
      if (printResponse) {
        printResponseData(endpoint.path, data);
      }
      console.log('');
    } else {
      console.log(`*** Endpoint ${endpoint.path} is not reachable. Error:`, error);
    }
  }
};

checkEndpoints();
package.json
{
  "name": "test-llama",
  "version": "1.0.0",
  "description": "",
  "main": "index.js",
  "scripts": {
    "start": "node app.js",
    "test": "echo \"Error: no test specified\" && exit 1"
  },
  "author": "",
  "license": "ISC",
  "dependencies": {
    "axios": "^1.6.7",
    "dotenv": "^16.4.1"
  }
}
.env
# Base URL for the API
BASE_URL=https://mixtral-test-prod.meetrix.io/v1

# Model to be used in requests
MODEL=mixtral-8x7b-instruct-v0.1

# Prompts for different endpoints
# /completions and /chat/completions
PROMPT1=What is the capital of France?
# /embeddings
PROMPT2=The food was delicious and the waiter...

# Whether to print responses for each endpoint
PRINT_COMPLETIONS_RESPONSE=true
PRINT_EMBEDDINGS_RESPONSE=false
PRINT_CHAT_COMPLETIONS_RESPONSE=true
PRINT_MODELS_RESPONSE=true

# Timeout for requests in milliseconds (default is 50000)
REQUEST_TIMEOUT=50000
Check Server Logs
Step 1: Log in to the server
- Open the terminal and go to the directory where your private key is located.
- Paste the following command into your terminal and press Enter:
ssh -i <your key name> ubuntu@<Public IP address>- Type "yes" and press Enter. This will log you into the server.

Step 2: Check the logs
sudo tail -f /var/log/syslogUpgrades
When there is an upgrade, we will update the product with a newer version. You can check the product version in AWS Marketplace. If a newer version is available, you can remove the previous version and launch the product again using the newer version. Remember to backup the necessary server data before removing.
Troubleshoot
- If you face the following error, please follow https://meetrix.io/blogs/increase-aws-vcpu-quota/ to increase vCPU quota.
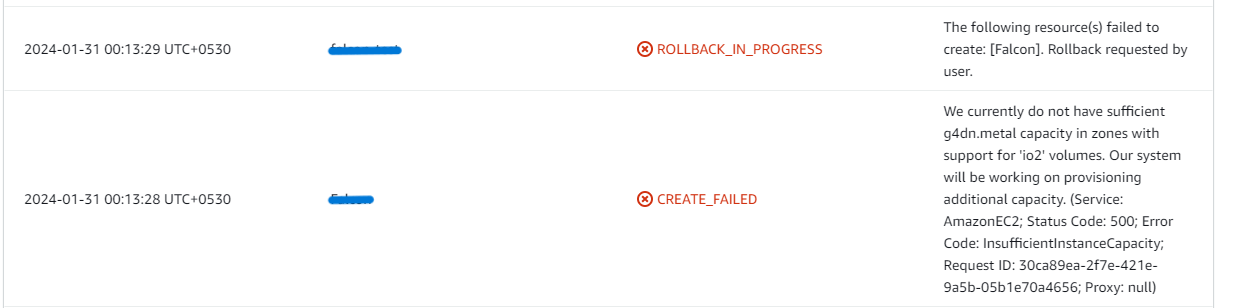
- If you face the following error ("do not have sufficient <instance_type> capacity...") while creating the stack, try changing the region or try creating the stack at a later time.
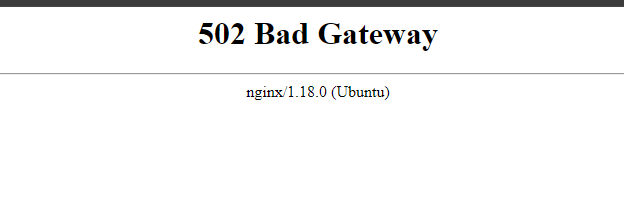
- If you face the below error, when you try to access the API dashboard, please wait 5-10 minutes and then try.
Conclusion
Finally, the Meetrix Mistral Developer Guide is your essential companion in the seamless integration of Mistral into your AWS setup. Regardless of your level of experience as a developer, our guide offers comprehensive, sequential instructions to guarantee a smooth setup procedure. Mistral, a sophisticated AI model created especially for seamless AWS compatibility, combines power and simplicity in one convenient package. It accommodates both beginners and specialists, providing simple access to strong AI capabilities without the usual complications. With the help of Mistral AI and the approachable guidance found in the Meetrix Mistral Developer Guide, you can confidently embark into the future of artificial intelligence.
Technical Support
Reach out to Meetrix Support (aws@meetrix.io) for assistance with Mistral issues.
Frequently Asked Questions
What is Mistral?
Mistral is a sophisticated AI model built for seamless AWS compatibility, offering strong AI capabilities that are accessible to both beginners and specialists.
What are the prerequisites for deploying Mistral on AWS?
You need basic knowledge of AWS services (EC2, CloudFormation), an active AWS account with appropriate permissions, and enough vCPU limit to launch a g5g instance type.
Which instance type does Mistral use?
Mistral is deployed on a g5g type instance. We recommend g5g.xlarge as the instance type during CloudFormation stack creation.
Does Mistral support the chat completions endpoint?
Yes. Unlike some other models, Mistral supports /v1/chat/completions in addition to /v1/completions, /v1/embeddings, and the CoPilot Codex completions endpoint.
How do I test the Mistral API after deployment?
Create a small Node.js script with app.js, package.json, and a .env file, run npm install followed by npm start, and it will check the /completions, /embeddings, /chat/completions, and /models endpoints and print the responses.
How do I handle upgrades?
When a newer version is available in AWS Marketplace, back up any necessary server data, remove the previous deployment, and relaunch the product using the newer version.
How do I get technical support?
Reach out to Meetrix Support at aws@meetrix.io for assistance with Mistral issues.
Ready to Deploy Your Own Mistral Instance?
Get started in minutes with our pre-configured AMI and bring powerful, accessible AI capabilities to your development environment.
Deploy Mistral from AWS Marketplace