Jitsi Meet is an open-source video conferencing service based on WebRTC for platforms like Windows, Linux, Mac OS, and Android. It incorporates voice, high-quality videoconferencing and instant messaging services with end-to-end encryption for secure communications.
In this tutorial you will learn how to install and configure Jitsi Meet on Ubuntu 20.04.
Step 1: Ensure that your system is up to date and that all necessary packages are installed.
Run the following apt commands in your terminal.
This will obtain the latest package versions from all repositories in order to run other commands without getting errors due to version incompatibilities.
sudo apt update
sudo apt upgrade
This will enable support for apt repositories via HTTPS
apt install apt-transport-https
Before installing Jitsi Meet get the nginx package onto your server.
sudo apt-get install nginx
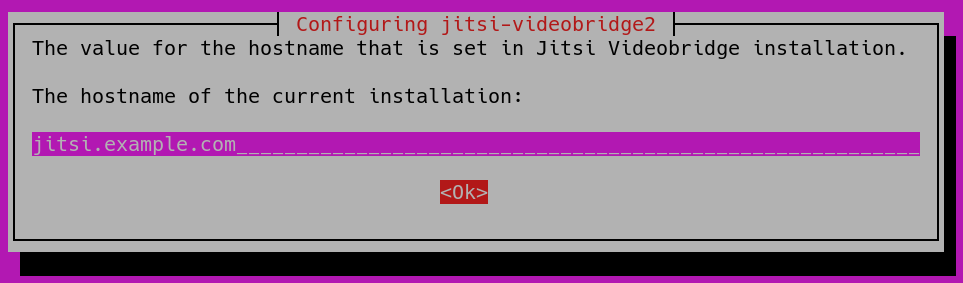
Step 2: Set the hostname to the domain name that you will use for your Jitsi instance (eg: meet.example.org). The following command will set your Jitsi meet application's domain name as your server hostname.
(If your Jitsi meet domain name is meet.example.org then you have to run the command as follows)
sudo hostnamectl set-hostname meet.example.org
Use the following command to verify the given domain. It will return the hostname you set in step 2.
hostname
Step 3: Add the same domain name to the /etc/hosts file with your server's public IP address.
127.0.0.1 localhost
x.x.x.x meet.example.org
Note that x.x.x.x should be your server's public IP address
Step 4 : Create a sources.list file with the repository.
This adds the Prosody repository, which installs the updated Prosody needed for features, including the lobby feature.
echo deb http://packages.prosody.im/debian $(lsb_release -sc) main | sudo tee -a /etc/apt/sources.list
This will enable the Jitsi Meet packages by adding the jitsi repository to your package sources.
Step 5 : Install the Jitsi repository key onto your system.
wget https://prosody.im/files/prosody-debian-packages.key -O- | sudo apt-key add -
Step 6: Add the Jitsi package repository
curl https://download.jitsi.org/jitsi-key.gpg.key | sudo sh -c 'gpg --dearmor > /usr/share/keyrings/jitsi-keyring.gpg'

echo 'deb [signed-by=/usr/share/keyrings/jitsi-keyring.gpg] https://download.jitsi.org stable/' | sudo tee /etc/apt/sources.list.d/jitsi-stable.list > /dev/null
Step 7: Update all package sources.
sudo apt update
Step 8: Install Jitsi Meet.
sudo apt install jitsi-meet
You'll be asked to enter the domain name (meet.example.org) for your Jitsi Meet instance during the installation. Make sure to enter the same domain name given in step 2.
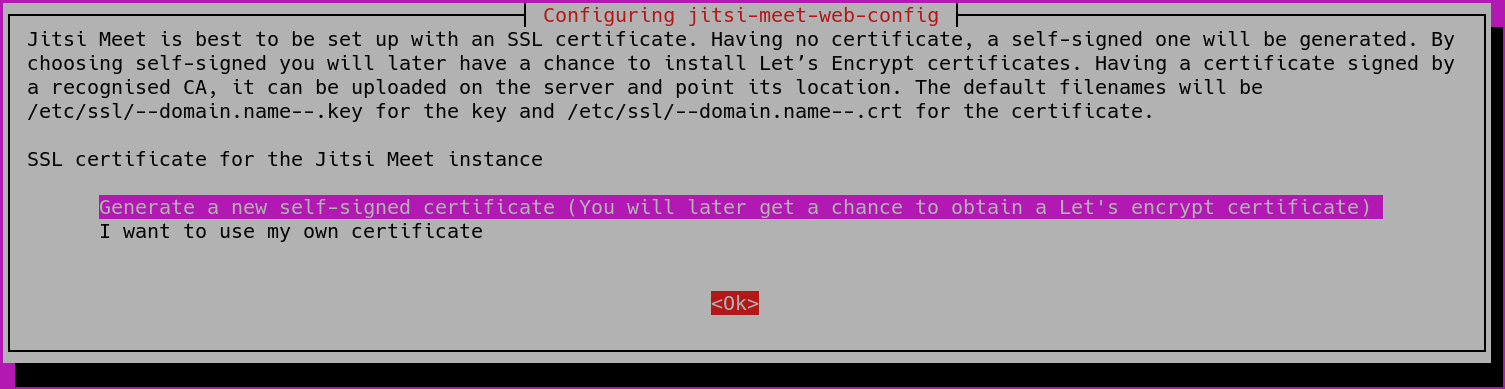
During the Jitsi meet installation, you can choose the "generate a new self-signed certificate" option, so you can obtain and install a trusted Let's Encrypt certificate later or if you already have a signed TLS certificate, you can use it by selecting "I want to use my own certificate."
Now you have completed installing Jitsi meet in your Ubuntu 20.04 server.
Step 9: If you are using the ufw firewall, configure it as follows.
To allow traffic to the Jitsi Meet server, the following ports must be open in your firewall:
- 80 / tcp - need to open for for SSL certificate verification / renewal with Let's Encrypt
- 443 / tcp - Allow users to join a video conference from a web browser
- 4443/tcp - To function jitsi meet in restricted firewalls
- 10000 / udp - Use for general network video/audio communications
- 22 / tcp - Should be open if you are accessing the server using SSH
- 5349 TCP - for fallback network video/audio communications over TCP (when UDP is blocked for example)
Run the below commands to open those ports:
sudo ufw allow 80/tcp
sudo ufw allow 443/tcp
sudo ufw allow 4443/tcp
sudo ufw allow 10000/udp
sudo ufw allow 22/tcp
sudo ufw allow 5349/tcp

sudo ufw enable
You can check the status of the firewall with this command:
sudo ufw status verbose
Step 10: Installing Lets Encrypt SSL Certificates
This step is optional but it is recommended to have encrypted communications. Run the following script to request a Let's Encrypt SSL certificate.
sudo apt install certbot
sudo /usr/share/jitsi-meet/scripts/install-letsencrypt-cert.sh
Now you can check your jitsi meet application and you will be able to experience high quality voice and video conferencing by going to your Jitsi url. https://'your_jitsi_meet_domain' (eg: https:/meet.example.org)
Leave a Comment